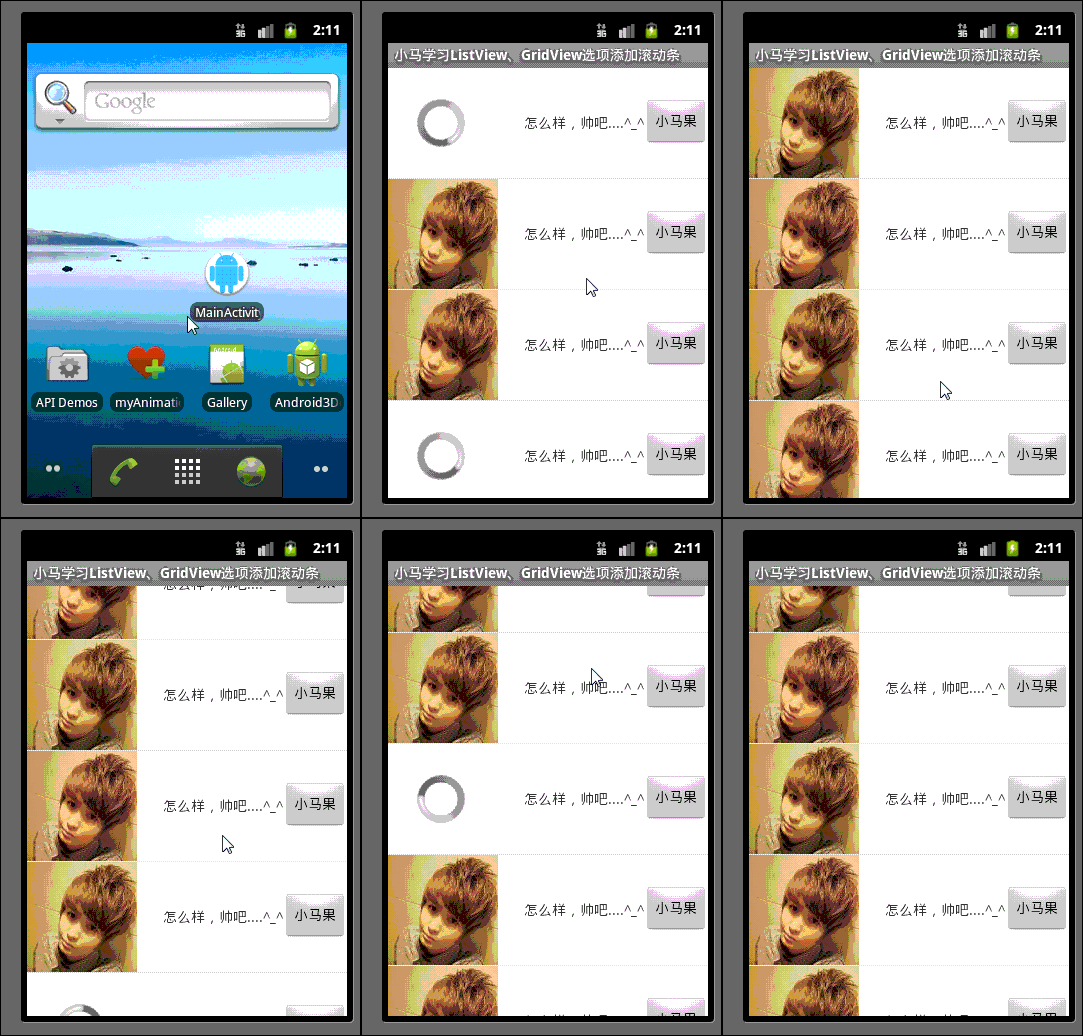
今天有时间就学习了下在ListView、GridView列表项中清加ProgressBar,本文用最简单的代码实现可以通用的功能,人人都能看懂,哈哈,直接说下,如果你的适配器getView方法返回的View是一个自定义控件的话,有点不好实现哦,不过可以用两个控件之间Visible 、Invisible来切换实现今天的效果,下面的例子是主类、适配器、异步下载类等的都写在一个类里面了,为的是发的博文里一次性看的话方便,如果大家觉得结构不清楚的话根据自身需求自行抽取下,今天的DEMO只是个简单的思路,其它控件列表项中添加进度框大家也可以用如下的方法实现,老规矩,先看效果,再看代码(截图有点失真,但无防):
一:效果图如下

二:效果看完了,看下实现的路是怎样的,吼吼:核心代码如下:
Java代码
- package com.example.listviewitemprogress;
- import java.io.InputStream;
- import java.net.HttpURLConnection;
- import java.net.URL;
- import android.app.Activity;
- import android.content.Context;
- import android.graphics.Bitmap;
- import android.graphics.BitmapFactory;
- import android.os.AsyncTask;
- import android.os.Bundle;
- import android.view.LayoutInflater;
- import android.view.View;
- import android.view.ViewGroup;
- import android.widget.BaseAdapter;
- import android.widget.Button;
- import android.widget.ImageView;
- import android.widget.ListView;
- import android.widget.ProgressBar;
- import android.widget.TextView;
- /**
- * @author 小马果
- * ListView列表项中添加ProgressBar
- */
- public class MainActivity extends Activity {
- private ListView mListView = null ;
- private static final String imgUrl = "http://www.qq510.net/uploads/allimg/100613/2_100613171230_5.jpg";
- @Override
- public void onCreate(Bundle savedInstanceState) {
- super.onCreate(savedInstanceState);
- setContentView(R.layout.activity_main);
- init();
- }
- private void init(){
- mListView = (ListView)findViewById(R.id.listview);
- mListView.setAdapter(new MyListViewAdapter(this));
- }
- private class MyListViewAdapter extends BaseAdapter{
- private LayoutInflater inflater = null;
- public MyListViewAdapter(Context con){
- inflater = (LayoutInflater)con.getSystemService(LAYOUT_INFLATER_SERVICE);
- }
- @Override
- public int getCount() {
- // TODO Auto-generated method stub
- return Integer.MAX_VALUE;
- }
- @Override
- public Object getItem(int arg0) {
- // TODO Auto-generated method stub
- return arg0;
- }
- @Override
- public long getItemId(int position) {
- // TODO Auto-generated method stub
- return position;
- }
- @Override
- public View getView(int position, View convertView, ViewGroup parent) {
- // TODO Auto-generated method stub
- ViewHolder mHolder = new ViewHolder() ;
- if(convertView == null){
- convertView = inflater.inflate(R.layout.list_item, null);
- mHolder.iv = (ImageView)(convertView.findViewById(R.id.iv));
- mHolder.mBtn = (Button)(convertView.findViewById(R.id.button));
- mHolder.pb = (ProgressBar)(convertView.findViewById(R.id.progressBar1));
- mHolder.tv = (TextView)(convertView.findViewById(R.id.textView1));
- convertView.setTag(mHolder);
- }else{
- mHolder = (ViewHolder)convertView.getTag();
- }
- new AsyncTask<ViewHolder, Void, Bitmap>() {
- private ViewHolder v;
- @Override
- protected Bitmap doInBackground(ViewHolder... params) {
- v = params[0];
- return BitmapFactory.decodeStream(getStreamFromURL(imgUrl));
- }
- @Override
- protected void onPostExecute(Bitmap result) {
- super.onPostExecute(result);
- v.pb.setVisibility(View.GONE);
- v.mBtn.setVisibility(View.VISIBLE);
- v.iv.setImageBitmap(result);
- }
- }.execute(mHolder);
- return convertView;
- }
- }
- static class ViewHolder{
- ImageView iv = null ;
- Button mBtn = null ;
- ProgressBar pb = null ;
- TextView tv = null ;
- }
- static String length;
- public static InputStream getStreamFromURL(String imageURL) {
- InputStream in=null;
- try {
- URL url=new URL(imageURL);
- HttpURLConnection connection=(HttpURLConnection) url.openConnection();
- // connection.setRequestProperty("Connection", "Keep-Alive");//维持长连接
- connection.setConnectTimeout(6* 1000);//设置连接超时
- if (connection.getResponseCode() != 200) throw new RuntimeException("请求失败");
- length = connection.getHeaderField("Content-Length");
- in=connection.getInputStream();
- } catch (Exception e) {
- // TODO Auto-generated catch block
- e.printStackTrace();
- }
- return in;
- }
- }
三:再来看下两个布局吧(为方便查就放一起了:)
主布局文件:
XML/HTML代码
- <RelativeLayout xmlns:android="http://schemas.android.com/apk/res/android"
- xmlns:tools="http://schemas.android.com/tools"
- android:layout_width="match_parent"
- android:layout_height="match_parent" >
- <ListView
- android:id="@+id/listview"
- android:layout_width="fill_parent"
- android:layout_height="fill_parent"
- android:drawSelectorOnTop="false"
- android:choiceMode="none"
- android:focusable="false"
- android:scrollingCache="false"
- android:fadingEdge="none"
- android:focusableInTouchMode="false"
- android:clickable="false"
- android:dividerHeight="0.5dip" />
- </RelativeLayout>
- ListView列表控件Item布局:
- <RelativeLayout xmlns:android="http://schemas.android.com/apk/res/android"
- xmlns:tools="http://schemas.android.com/tools"
- android:layout_width="match_parent"
- android:layout_height="110dp"
- android:background="#00ffeeaa"
- >
- <ImageView
- android:id="@+id/iv"
- android:layout_width="110dp"
- android:background="@drawable/ic_action_search"
- android:layout_height="110dp"
- android:contentDescription="@string/hello_world"/>
- <Button
- android:id="@+id/button"
- android:layout_width="wrap_content"
- android:layout_height="wrap_content"
- android:layout_alignParentRight="true"
- android:layout_centerVertical="true"
- android:text="@string/xiaomaguo"/>
- <ProgressBar
- android:id="@+id/progressBar1"
- android:layout_width="wrap_content"
- android:layout_height="wrap_content"
- android:layout_alignParentLeft="true"
- android:layout_centerVertical="true"
- android:layout_alignTop="@+id/button"
- android:layout_marginLeft="29dp" />
- <TextView
- android:id="@+id/textView1"
- android:layout_width="wrap_content"
- android:layout_height="wrap_content"
- android:layout_alignBaseline="@+id/button"
- android:layout_alignBottom="@+id/button"
- android:layout_centerVertical="true"
- android:layout_toLeftOf="@+id/button"
- android:text="@string/cool" />
- </RelativeLayout>
最后,由于选项中使用的图片是从网上异步下载加载的,所以得开下联网权限,大家别忘了加就行了,如下:
<uses-permission android:name=”android.permission.INTERNET”/>
怎么样?简单吧,刚开始的时间没思路,后来玩花辨的时候想到了,美丽说瀑布流实现的原理跟这个差不多,上面这个只是个小的DEMO,给大家提供个思路,GridView等其它控件,大家可以直接参照上面这个代码来写,吼吼,小DEMO源码在WorePress中好像没上传支持的功能哇,有兴趣的朋友可以点此处下载,觉得有用就下下来瞅瞅吧,加油,每天进步一点点,祝 :Happy ! O_O