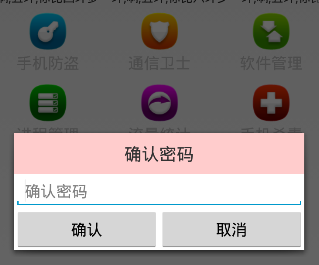
本文接着实现“确认密码”功能,也即是用户以前设置过密码,现在只需要输入确认密码

布局文件和《Android 手机卫士--设置密码对话框》中的布局基本类似,所有copy一下,修改一点细节就搞定:
XML/HTML代码
- <?xml version="1.0" encoding="utf-8"?>
- <LinearLayout xmlns:android="http://schemas.android.com/apk/res/android"
- android:layout_width="match_parent"
- android:layout_height="match_parent"
- android:orientation="vertical">
- <TextView
- style="@style/TitleStyle"
- android:background="#f00"
- android:text="确认密码"
- />
- <EditText
- android:id="@+id/et_confirm_psd"
- android:layout_width="match_parent"
- android:layout_height="wrap_content"
- android:hint="确认密码"
- />
- <LinearLayout
- android:layout_width="match_parent"
- android:layout_height="wrap_content">
- <Button
- android:id="@+id/bt_submit"
- android:layout_width="0dp"
- android:layout_height="wrap_content"
- android:layout_weight="1"
- android:text="确认" />
- <Button
- android:id="@+id/bt_cancel"
- android:layout_width="0dp"
- android:layout_height="wrap_content"
- android:layout_weight="1"
- android:text="取消" />
- </LinearLayout>
- </LinearLayout>
代码逻辑也基本类似,简单的修改一下
Java代码
- /**
- * 确认密码对话框
- */
- private void showConfirmPsdDialog() {
- //需要自己去定义对话框的显示样式,所以要调用dialog.setView(view);
- Builder builder = new Builder(this);
- final AlertDialog dialog = builder.create();
- final View view = inflate(this, R.layout.dialog_confirm_psd, null);
- //让对话框显示一个自己定义的对话框界面效果
- dialog.setView(view);
- dialog.show();
- Button bt_submit = (Button) view.findViewById(R.id.bt_submit);
- Button bt_cancel = (Button) view.findViewById(R.id.bt_cancel);
- bt_submit.setOnClickListener(new OnClickListener() {
- @Override
- public void onClick(View v) {
- EditText et_confirm_psd = (EditText) view.findViewById(R.id.et_confirm_psd);
- String confirmPsd = et_confirm_psd.getText().toString();
- String psd = SpUtil.getString(getApplicationContext(),ConstantValue.MOBILE_SAFE_PSD, "");
- if(!TextUtils.isEmpty(confirmPsd)){
- //进入用户手机防盗模块
- if(psd.equals(confirmPsd)) {
- Intent intent = new Intent(getApplicationContext(), testActivity.class);
- startActivity(intent);
- //跳转到新的界面以后需要去隐藏对话框
- dialog.dismiss();
- } else {
- ToastUtil.show(getApplicationContext(),"输入密码错误");
- }
- }else{
- //提示用户密码输入为空的情况
- ToastUtil.show(getApplicationContext(),"请输入密码");
- }
- }
- });
- bt_cancel.setOnClickListener(new OnClickListener() {
- @Override
- public void onClick(View view) {
- dialog.dismiss();
- }
- });
- }
本文发布:Android开发网


发表评论:
◎欢迎参与讨论,请在这里发表您的看法、交流您的观点。