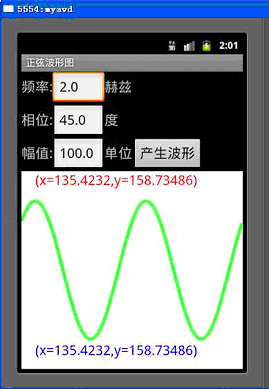
正弦波大家在数学中都学过,但是在Android开发中如何绘制正弦波呢?本文将给出一个开发实例演示绘制过程。
大家先来看看最后的效果图:

下面贴上具体的代码:
1. layout下的main.xml文件
- <?xml version="1.0" encoding="UTF-8"?>
- <LinearLayout
- xmlns:android="http://schemas.android.com/apk/res/android"
- android:layout_width="fill_parent"
- android:layout_height="fill_parent"
- android:orientation="vertical" >
- <LinearLayout
- android:layout_width="match_parent"
- android:layout_height="wrap_content"
- android:orientation="horizontal">
- <TextView
- android:text="频率:"
- android:textSize="20sp"
- android:layout_width="wrap_content"
- android:layout_height="wrap_content"/>
- <EditText
- android:id="@+id/frequency"
- android:textSize="20sp"
- android:layout_width="75dip"
- android:layout_height="wrap_content"
- android:text="3"/>
- <TextView
- android:text="赫兹"
- android:textSize="20sp"
- android:layout_width="wrap_content"
- android:layout_height="wrap_content"/>
- </LinearLayout>
- <LinearLayout
- android:layout_width="match_parent"
- android:layout_height="wrap_content"
- android:orientation="horizontal">
- <TextView
- android:text="相位:"
- android:textSize="20sp"
- android:layout_width="wrap_content"
- android:layout_height="wrap_content"/>
- <EditText
- android:id="@+id/phase"
- android:textSize="20sp"
- android:layout_width="75dip"
- android:layout_height="wrap_content"
- android:text="30.0"/>
- <TextView
- android:text="度"
- android:textSize="20sp"
- android:layout_width="wrap_content"
- android:layout_height="wrap_content"/>
- </LinearLayout>
- <LinearLayout
- android:layout_width="match_parent"
- android:layout_height="wrap_content"
- android:orientation="horizontal">
- <TextView
- android:text="幅值:"
- android:textSize="20sp"
- android:layout_width="wrap_content"
- android:layout_height="wrap_content"/>
- <EditText
- android:id="@+id/amplifier"
- android:textSize="20sp"
- android:layout_width="75dip"
- android:layout_height="wrap_content"
- android:text="100"/>
- <TextView
- android:text="单位"
- android:textSize="20sp"
- android:layout_width="wrap_content"
- android:layout_height="wrap_content"/>
- <Button
- android:id="@+id/wave"
- android:textSize="20sp"
- android:layout_width="wrap_content"
- android:layout_height="wrap_content"
- android:text="产生波形"/>"
- </LinearLayout>
- <com.kernel.minthen.SineWave
- android:layout_width="match_parent"
- android:layout_height="match_parent">
- </com.kernel.minthen.SineWave>
- </LinearLayout>
备注:com.kernel.minthen.SineWave系自己写的产生正弦波的类。
2. src下的SineWave.java文件,用于根据幅度、频率和相位设置产生正弦波,代码如下:
- package com.kernel.minthen;
- import android.content.Context;
- import android.graphics.Canvas;
- import android.graphics.Color;
- import android.graphics.Paint;
- import android.graphics.Path;
- import android.util.AttributeSet;
- import android.view.MotionEvent;
- import android.view.View;
- import java.lang.Math;
- public class SineWave extends View implements Runnable{
- private Paint mPaint = null;
- private static float amplifier = 100.0f;
- private static float frequency = 2.0f; //2Hz
- private static float phase = 45.0f; //相位
- private int height = 0;
- private int width = 0;
- private static float px=-1,py=-1;
- private boolean sp=false;
- public SineWave(Context context){
- super(context);
- mPaint = new Paint();
- new Thread(this).start();
- }
- //如果不写下面的构造函数,则会报错:custom view SineWave is not using the 2- or 3-argument View constructors
- public SineWave(Context context, AttributeSet attrs){
- super(context,attrs);
- mPaint = new Paint();
- new Thread(this).start();
- }
- public SineWave(Context context,float amplifier,float frequency,float phase){
- super(context);
- this.frequency = frequency;
- this.amplifier = amplifier;
- this.phase = phase;
- mPaint = new Paint();
- new Thread(this).start();
- }
- public float GetAmplifier(){
- return amplifier;
- }
- public float GetFrequency(){
- return frequency;
- }
- public float GetPhase(){
- return phase;
- }
- public void Set(float amplifier,float frequency,float phase){
- this.frequency = frequency;
- this.amplifier = amplifier;
- this.phase = phase;
- }
- public void SetXY(float px,float py)
- {
- this.px = px;
- this.py = py;
- }
- public void onDraw(Canvas canvas){
- super.onDraw(canvas);
- canvas.drawColor(Color.WHITE);
- height = this.getHeight();
- width = this.getWidth();
- mPaint.setAntiAlias(true);
- mPaint.setColor(Color.GREEN);
- amplifier = (amplifier*2>height)?(height/2):amplifier;
- mPaint.setAlpha(200);
- mPaint.setStrokeWidth(5);
- float cy = height/2;
- //float py=this.py-this.getTop();
- for(int i=0;i<width-1;i++)
- {
- canvas.drawLine((float)i, cy-amplifier*(float)(Math.sin(phase*2*(float)Math.PI/360.0f+2*Math.PI*frequency*i/width)), (float)(i+1), cy-amplifier*(float)(Math.sin(phase*2*(float)Math.PI/360.0f+2*Math.PI*frequency*(i+1)/width)), mPaint);
- float point = cy-amplifier*(float)(Math.sin(phase*2*(float)Math.PI/360.0f+2*Math.PI*frequency*i/width));
- if((py>=(point-2.5f))&&(py<=(point+2.5f))&&(px>=i-2.5f)&&(px<=i+2.5f))
- sp = true;
- }
- if(sp)
- {
- mPaint.setColor(Color.RED);
- mPaint.setTextSize(20);
- canvas.drawText("(x="+Float.toString(px)+",y="+Float.toString(py)+")", 20, 20, mPaint);
- sp = false;
- }
- mPaint.setColor(Color.BLUE);
- mPaint.setTextSize(20);
- canvas.drawText("(x="+Float.toString(px)+",y="+Float.toString(py)+")", 20, this.getHeight()-20, mPaint);
- }
- @Override
- public boolean onTouchEvent(MotionEvent event) {
- // TODO Auto-generated method stub
- float px = event.getX();
- float py = event.getY();
- this.SetXY(px, py);
- return super.onTouchEvent(event);
- }
- @Override
- public void run() {
- // TODO Auto-generated method stub
- while(!Thread.currentThread().isInterrupted())
- {
- try{
- Thread.sleep(1000);
- }catch(InterruptedException e)
- {
- Thread.currentThread().interrupt();
- }
- postInvalidate();
- }
- }
- }
3. src下主Activity文件mySine.java,代码如下:
- package com.kernel.minthen;
- import android.app.Activity;
- import android.os.Bundle;
- import android.view.MotionEvent;
- import android.view.View;
- import android.widget.Button;
- import android.widget.TextView;
- public class mySine extends Activity{
- private TextView frequency=null;
- private TextView phase=null;
- private TextView amplifier=null;
- private Button btnwave=null;
- SineWave sw=null;
- @Override
- protected void onCreate(Bundle savedInstanceState) {
- super.onCreate(savedInstanceState);
- sw = new SineWave(this);
- setContentView(R.layout.main);
- btnwave = (Button)findViewById(R.id.wave);
- frequency = (TextView)findViewById(R.id.frequency);
- phase = (TextView)findViewById(R.id.phase);
- amplifier = (TextView)findViewById(R.id.amplifier);
- btnwave.setOnClickListener(new Button.OnClickListener(){
- @Override
- public void onClick(View arg0) {
- // TODO Auto-generated method stub
- sw.Set(Float.parseFloat(amplifier.getText().toString()), Float.parseFloat(frequency.getText().toString()), Float.parseFloat(phase.getText().toString()));
- }
- });
- }
- @Override
- protected void onStart() {
- // TODO Auto-generated method stub
- super.onStart();
- frequency.setText(Float.toString(sw.GetFrequency()));
- phase.setText(Float.toString(sw.GetPhase()));
- amplifier.setText(Float.toString(sw.GetAmplifier()));
- }
- @Override
- public boolean onTouchEvent(MotionEvent event) {
- // TODO Auto-generated method stub
- //float px = event.getX();
- //float py = event.getY();
- //sw.SetXY(px, py);
- return super.onTouchEvent(event);
- }
- }
到此,正弦波的Android开发实例就讲完了,希望大家能从这个简单的例子中得到启发。


发表评论:
◎欢迎参与讨论,请在这里发表您的看法、交流您的观点。